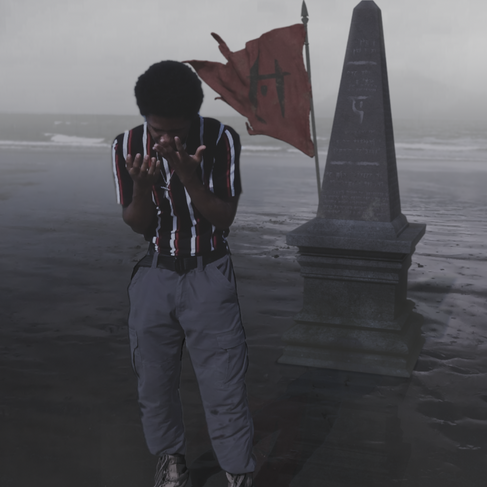
For shots 1& shot 4, I got some feedback from our mentor Nick

Shot 1:
Check the back of the actor's leg, feeling a dark edge on the back, and a bright edge on the front.
Watch the grading on his reflection/shadow. feeling reddish and cut out.
Let’s check the grading on the flag vs the obelisk, flag is appearing brighter than other objects in the scene.
I’m really enjoying the added atmosphere on the BG. feeling with that much wind and mist, that we’d also feel it in the FG as well, and this would help set the CG and actor into the scene overall better
Shot 4:
FG atmosphere as well
maybe lifting some of the actor and obelisk contrast slightly to sit better with the added fog/haze.
CG could use some additional shadowing to help ground them into the scene.
knocking down some of the highlights on the sand reflections directly surrounding the obelisk.
Are you able to get any of the actor's upper torso shadowed onto the obelisk? Seems 3D is providing a pass for this, so if it’s already there, let’s play it heavier.
The same note in the reflection of the actor in the sand feeling warm/cut out,
refining our keying/roto overall.
My Responsibility for Week 8 (shot 4_Hero shot)
Fog Refinement (add foreground fog)
New Cg flag integration
New Obelisk Integration
Roto Refinement
Facial Effects Fading
Color Correction
1. Fog Refinement
Based on the feedback I received from our mentor Nick, I add some foreground fog to the scene, the foreground fog can help roto a bit since the person is hard to key from the background.
The foreground has three layers, two in front of the obelisk but behind the actor, and one in front of the feet of the actor.
Fog adjustment before & after
2. New CG Flag Integration
With the new texture on the CG flag, I remerged it into the scene. The CG flag has four layers - beauty, shadow, reflection, and reflection mask.
The beauty pass & reflection pass
There are some unknown issues with the reflection mask of the flag, and the layer of the obelisk either. When I use the shuffle node to shuffle the red channel to the alpha channel, everything looks fine in the viewport, but when the tiff sequences are exported, I can see wired stripes at the bottom of the scene.

In this case, I use the Keyer node to extract the alpha channel from the reflection mask and apply it to the reflection layer, it works well in this way.

3. New Obelisk Integration
The new obelisk has five layers, with new layers of reflection, reflection mask, and shadow projection. The shadow projection works well in general, while the reflection mask layer has the same issue as the flag does.

4. Roto refinement
The roto is the trickiest part of this shot because of the shooting condition, it is hard to get a perfect key all the way through the shot. The person faces the sunlight first and turns around into a shadow, his leg and back become super dark in the second half of the shot.
5. Facial Effects Fading
The facial mask layer I got from my teammate
Frame range: 0-61

I first use the Keylight node to extract the cracking matte, my idea is to merge two colors to create the 3D Effects of cracking. The black color is set as the base of the cracking and the purple color is to create glowing effects.

6. Color Correction
I lifted some of the actor and obelisks contrast slightly to sit better with the added fog/haze.

The color correction node of the CG obelisk

The Next Step
Overall Refinement


Comments